


💥 Explore this insightful post from Hacker News 📖
📂 **Category**:
✅ **What You’ll Learn**:
I haven’t paid for Google photos for a long time, but I know several people that are now stuck forking out $20 or $30 a month just to keep their photo library intact. In many ways it makes sense to pay a big tech company to store your photos, they will have infrastructure and redundancy that you will simply never be able to replicate on your own. However, if you have an older computer lying around and want to save money, it’s now easier than ever to have a functioning “cloud” that you own for photo management.
The key components of what cloud storage offers
- The ability to upload photos from your device automatically
- The ability to browse and search photos by a filter (usually albums or date ranges)
- The ability to share photos with others
- Serve as a reliable backup long term
We’ll start with tackling the first two, which are very easy to achieve. You’ll need a machine with a little bit of storage capacity, some patience, and perhaps a cup of coffee.
Setting up docker
Docker is a platform that allows you to easily run applications within a “container”. Think of a container as an isolated bundle of parts that function as a whole to create an application. We’ll be using Immich as the application of choice, it is free and open-source, however there are many choices to pick from. This page offers a useful comparison chart.
Step 1: Install Docker on the machine you plan to use for the photo server
Docker offers installation instructions for Windows, MacOS and Linux. Follow those instructions and confirm that you are able to run the “Hello World” example at the end of the installation.
Step 2: Create the configuration files for Immich
Docker containers are created from a series of instructions, housed in a text file (conventionally called docker-compose.yml or compose.yml). First, plan out a folder within the file system on the machine where you plan to store everything for this setup (you could call it immich-app or my-photo-server), and create the two files below in that folder. You will only need these two files to get setup!
When you create the .env file, keep in mind that your file explorer may not show it by default (the . in the front indicates that it is a hidden file). However, tools such as VS Code or your text editor of choice should show it. If you cannot find it, consult the instructions from your operating systems file explorer on how to view hidden files.
Within the compose.yml file, copy and paste the following text:
name: immich

services:
  immich-server:
    container_name: immich_server
    image: ghcr.io/immich-app/immich-server:$💬


    volumes:

      - $⚡:/data
      - /etc/localtime:/etc/localtime:ro
    env_file:
      - .env
    ports:
      - '2283:2283'
    depends_on:
      - redis
      - database
    restart: always
    healthcheck:
      disable: false

  immich-machine-learning:
    container_name: immich_machine_learning


    image: ghcr.io/immich-app/immich-machine-learning:$💬


    volumes:
      - model-cache:/cache
    env_file:
      - .env
    restart: always
    healthcheck:
      disable: false

  redis:
    container_name: immich_redis
    image: docker.io/valkey/valkey:9@sha256:8e8d64b405ce18f41b8e5ee20aa4687a8ed0022d1298f2ce31cdcf3a76e09411
    healthcheck:
      test: redis-cli ping || exit 1
    restart: always

  database:
    container_name: immich_postgres
    image: ghcr.io/immich-app/postgres:14-vectorchord0.4.3-pgvectors0.2.0@sha256:bcf63357191b76a916ae5eb93464d65c07511da41e3bf7a8416db519b40b1c23
    environment:
      POSTGRES_PASSWORD: $💬
      POSTGRES_USER: ${DB_USERNAME}
      POSTGRES_DB: ${DB_DATABASE_NAME}
      POSTGRES_INITDB_ARGS: '--data-checksums'


    volumes:

      - ${DB_DATA_LOCATION}:/var/lib/postgresql/data
    shm_size: 128mb
    restart: always
    healthcheck:
      disable: false

volumes:
  model-cache:
Out of the gate, you should not need to change anything in the above. The most important part to note is the port that the service is going to be run on. If you think of a computer like a train station, the port tells you which platform to expect the Immich train to run out of. In this case, it is port 2283.
For the .env file, copy the text below. The only thing that should be changed is the DB_PASSWORD, just set this to some random string. If you like, you can use this tool to generate it. You may also wish to change the timezone, though this is optional.
# You can find documentation for all the supported env variables at https://docs.immich.app/install/environment-variables

# The location where your uploaded files are stored
UPLOAD_LOCATION=./library

# The location where your database files are stored. Network shares are not supported for the database
DB_DATA_LOCATION=./postgres

# To set a timezone, uncomment the next line and change Etc/UTC to a TZ identifier from this list: https://en.wikipedia.org/wiki/List_of_tz_database_time_zones#List
# TZ=Etc/UTC

# The Immich version to use. You can pin this to a specific version like "v2.1.0"
IMMICH_VERSION=v3

# Connection secret for postgres. You should change it to a random password
# Please use only the characters `A-Za-z0-9`, without special characters or spaces
DB_PASSWORD=postgres

# The values below this line do not need to be changed
###################################################################################
DB_USERNAME=postgres
DB_DATABASE_NAME=immich
Step 3: Start the server
Either using the Docker desktop graphical user interface, or the command line, start the container. If you are doing it from the command line, make sure that you are in the directory you put the two files in, then run the command below:
sudo docker compose up -d
Step 4: Identify the private IP address
Before we move on to connecting to Immich from another machine, we need to know the IP address to connect to. Pick the command from the ones below based on your operating system, then jot the IP address down for future steps.
Linux
hostname -I | awk '{print $1}'
MacOS
You can use the Network tab in System Preferences, and you should see the IP address there. It should begin with either 10, 172, or 192
Windows
Go to Settings > Network and internet, and look for the IP4 address. It should begin with a 10, 172, or 192.
Using Immich
From a web browser
From another machine, test that you are able to connect to the web interface. Using the address you found above, type http://{ip_address}:2283 into the browser bar of a another machine on the same local network (i.e. a computer or phone connected to the same WiFi). You should be greeted by the setup process that will ask you to create the admin user. The account setup process should be nearly identical to account creation processes on other platforms.
Once setup, the interface is very similar to Google Photos, and should feel familiar.
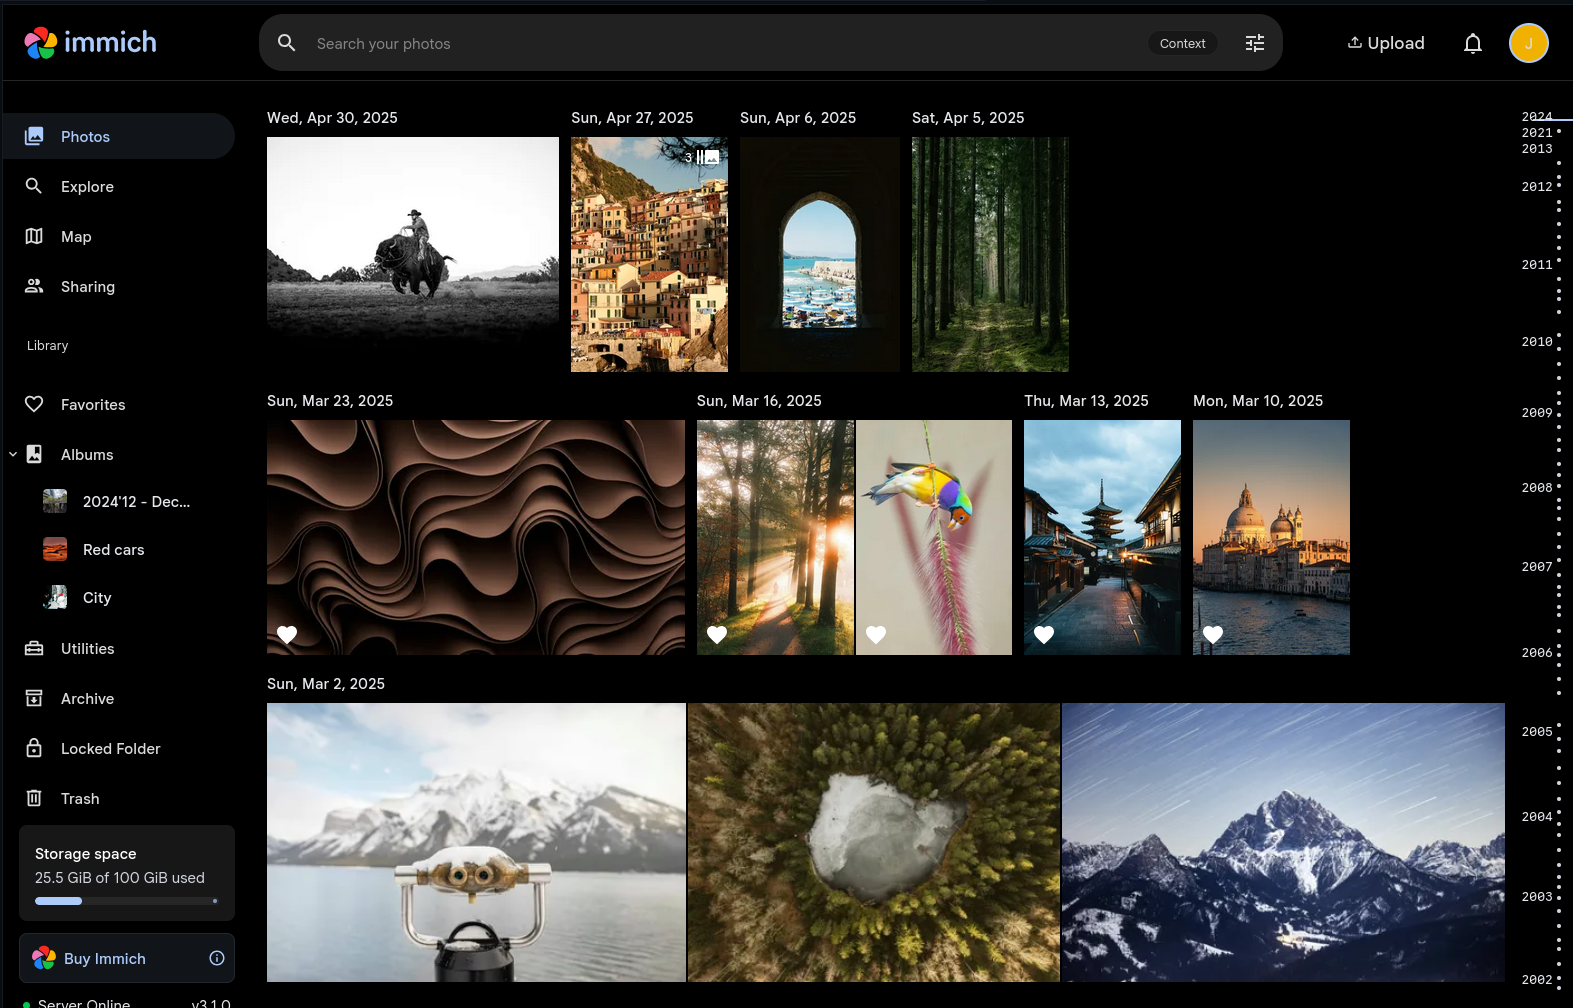
(Screenshot taken from the demo instance)
From a phone
In addition to accessing Immich through a browser, you can also access it from the Immich app. After downloading the app from either the Apple Store, Play Store, or Obtainium (if you want to not use either app store and download straight from GitHub), you will be asked to input the address of the Immich server. In this text box, put in the same http://{ip_address}:2283 you used above. Once connected, try uploading a photo.
Hardware considerations
Now that you have a working installation, you may notice that in the bottom lefthand corner Immich will tell you how much free space you have left. Most computers will come with between 256GB and 1TB of storage. The amount of photos you can store is broken down below, based on the assumption that each photo averages about 50MB.
| Storage Available | Number of Photos |
|---|---|
| 250GB | 5,000 |
| 500GB | 10,000 |
| 750 GB | 15,000 |
| 1 TB | 20,000 |
Storage is likely to be the limiting factor in this setup, Immich won’t use a lot of processing power or memory.
Where the photos are actually stored
Photos will be stored in the location defined by UPLOAD_LOCATION in the .env you setup earlier. By default, this is a library directory within the directory you setup Immich (the one that contains the compose.yml and .env file. To see what it looks like, you can either use a file browser or use the command line. Below I’ll show the output using the tree command on Linux.
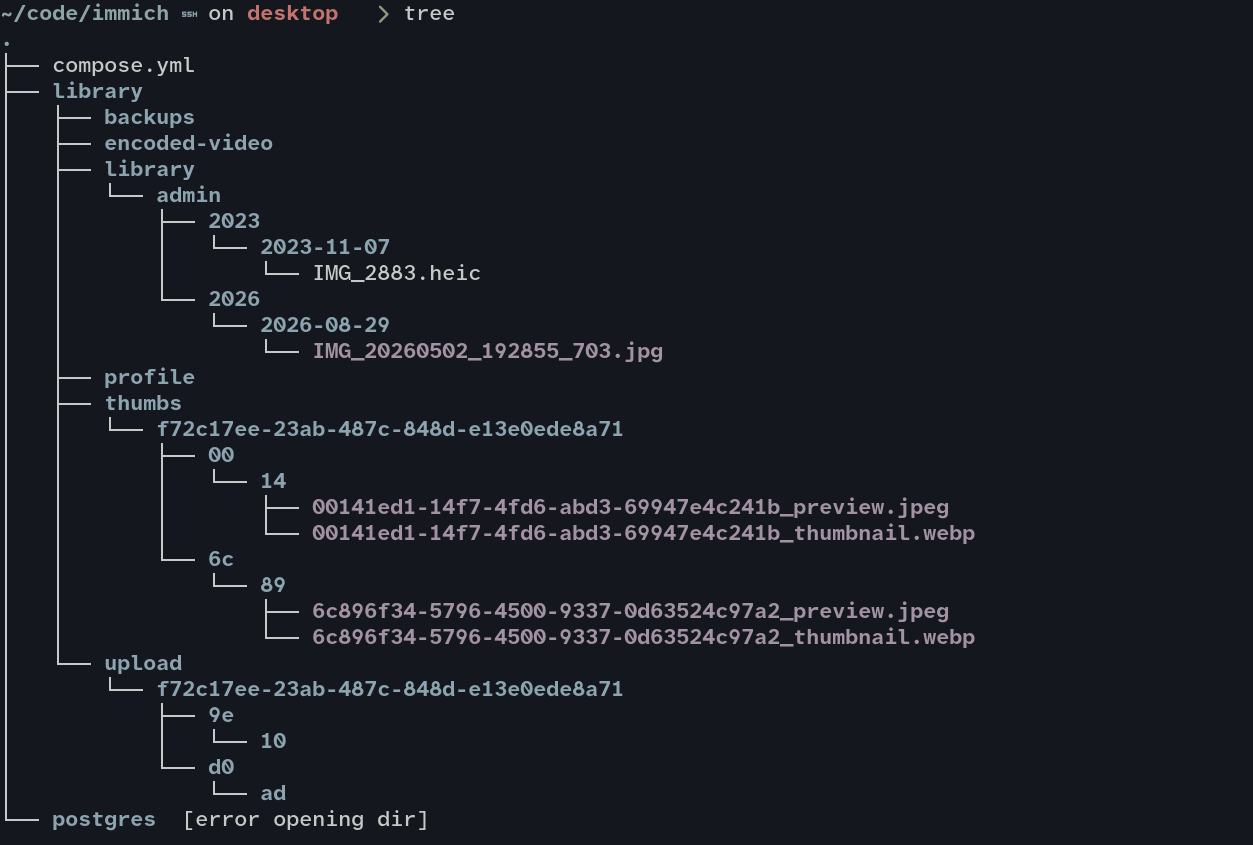
Notice within the library directory how there is an admin directory. This represents the photos stored under that user account, and we can see the two images I have uploaded to test. This is the folder that you would want to backup, which is covered in the next section.
Backing up your photos
You don’t want to solely rely on the disk within this machine to store all your precious memories. There are many backup methods you may wish to pursue, but all of them will at a minimum involve copying that library directory above somewhere else. You may choose to use any of the methods below, or even combining them to make a more robust backup process.
- An external hardrive. Just plug this into the machine every 3 months or so, and copy the directory above. Note that this is neither automatic nor geographically redundant, however it is very simple.
- Use a cloud backup service such as Backblaze. For $7 a month (at the time of writing) you can get 1TB of capacity. Just make sure that the
UPLOAD_LOCATIONdirectory (libraryby default) is included in the regular backup, and that you receive a notification or warning if a regularly scheduled backup fails. - Use a Network Attached Storage device that has redundancy between disks through RAID.
Sharing photos with others and accessing on the go
If you wish to share your library with others, or access outside of your home, you will need to do some extra work. I’ll leave it outside of the scope of this article, since it is substantially higher in difficulty, but essentially you need to:
- Use a machine that is already internet accessible (such as a virtual machine from a cloud provider)
or
- Enable outside access to the machine within your home (such as through a Cloudflare tunnel).
In either case, you will likely want to configure a reverse proxy, perhaps get a cheap domain name, and make sure that you take precautions and care when it comes to security. If you want a plug and play solution that is not quite as economical as hosting it yourself, you may opt for a service like PikaPods which will allow you to instantly configure a machine with Immich, and connect up to 1TB of storage.
Conclusion
Getting Immich setup on your own local network, with a machine you may have lying around, is easier than you think. If you are comfortable setting up a backup system that allows you to sleep at night, you can potentially save a lot of money compared to paying for a monthly subscription for Google Photos or iCloud storage. The only downside is that photos will be backed up the next time your phone connects to your home Wifi (as opposed to instantly if you have cell service). However, don’t overlook that your phone has storage of it’s own! If you only need access to 1000 photos on the go, then your phone can store those on its own, and then you can manage the rest of your library through Immich.
{💬|⚡|🔥} **What’s your take?**
Share your thoughts in the comments below!
#️⃣ **#personal #photo #storage**
🕒 **Posted on**: 1788366978
🌟 **Want more?** Click here for more info! 🌟
